


Written by: Annie Shi
Five Banners Burning is a campaign frame defined by fragmented power and fragile alliances. The setting tells a story of cities under strain, banners raised in defiance, institutions trying to hold legitimacy, and ordinary people caught in the fallout of political ambition.
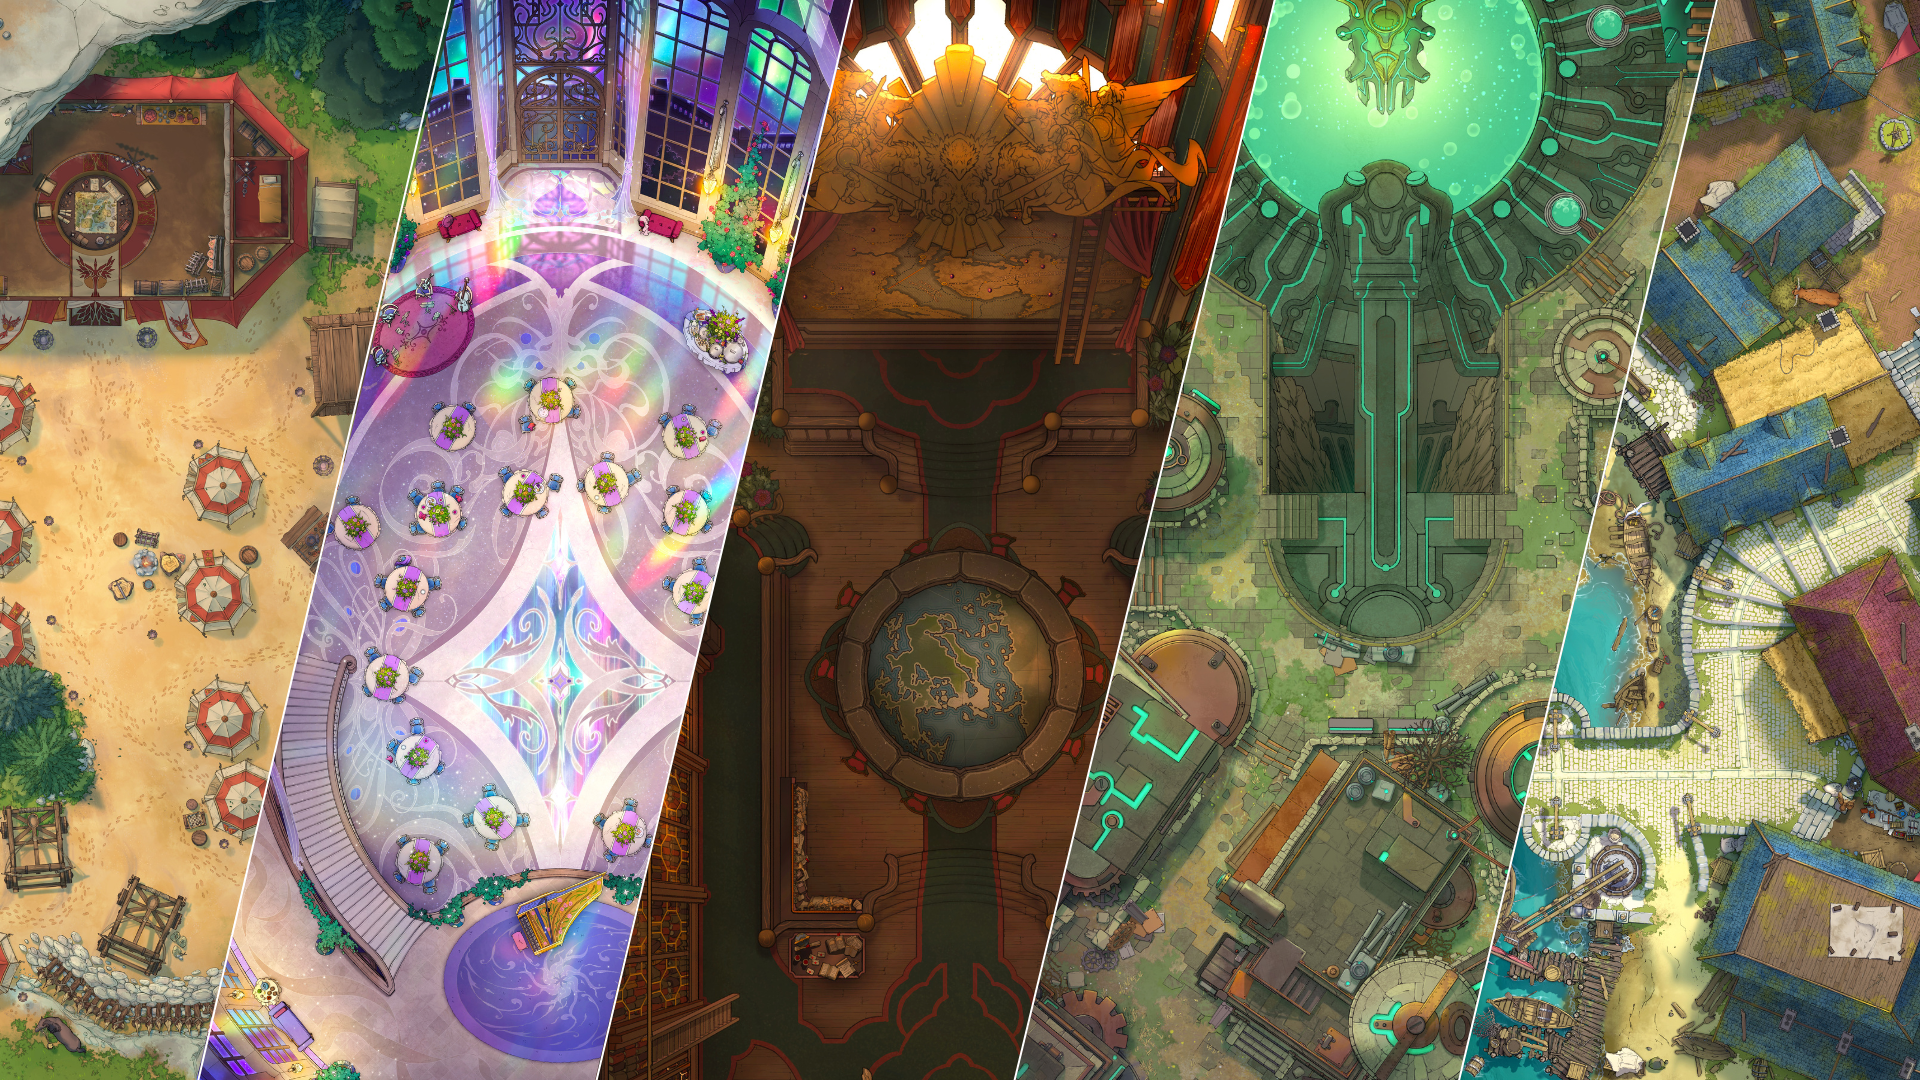
Because so much of the story unfolds in cities and public spaces, battlemaps are incredibly valuable. The right map doesn’t just show where characters are standing; it communicates what sort of authority a place holds, where danger is simmering, and what’s at stake when things go wrong. These ten Five Banners Burning maps align excellently with the locations and themes described in the campaign frame, providing your table with powerful visual anchors for political drama and urban unrest.
1. Armada — Pirate Lord’s Lair + Pirate Lord’s Lair Interior
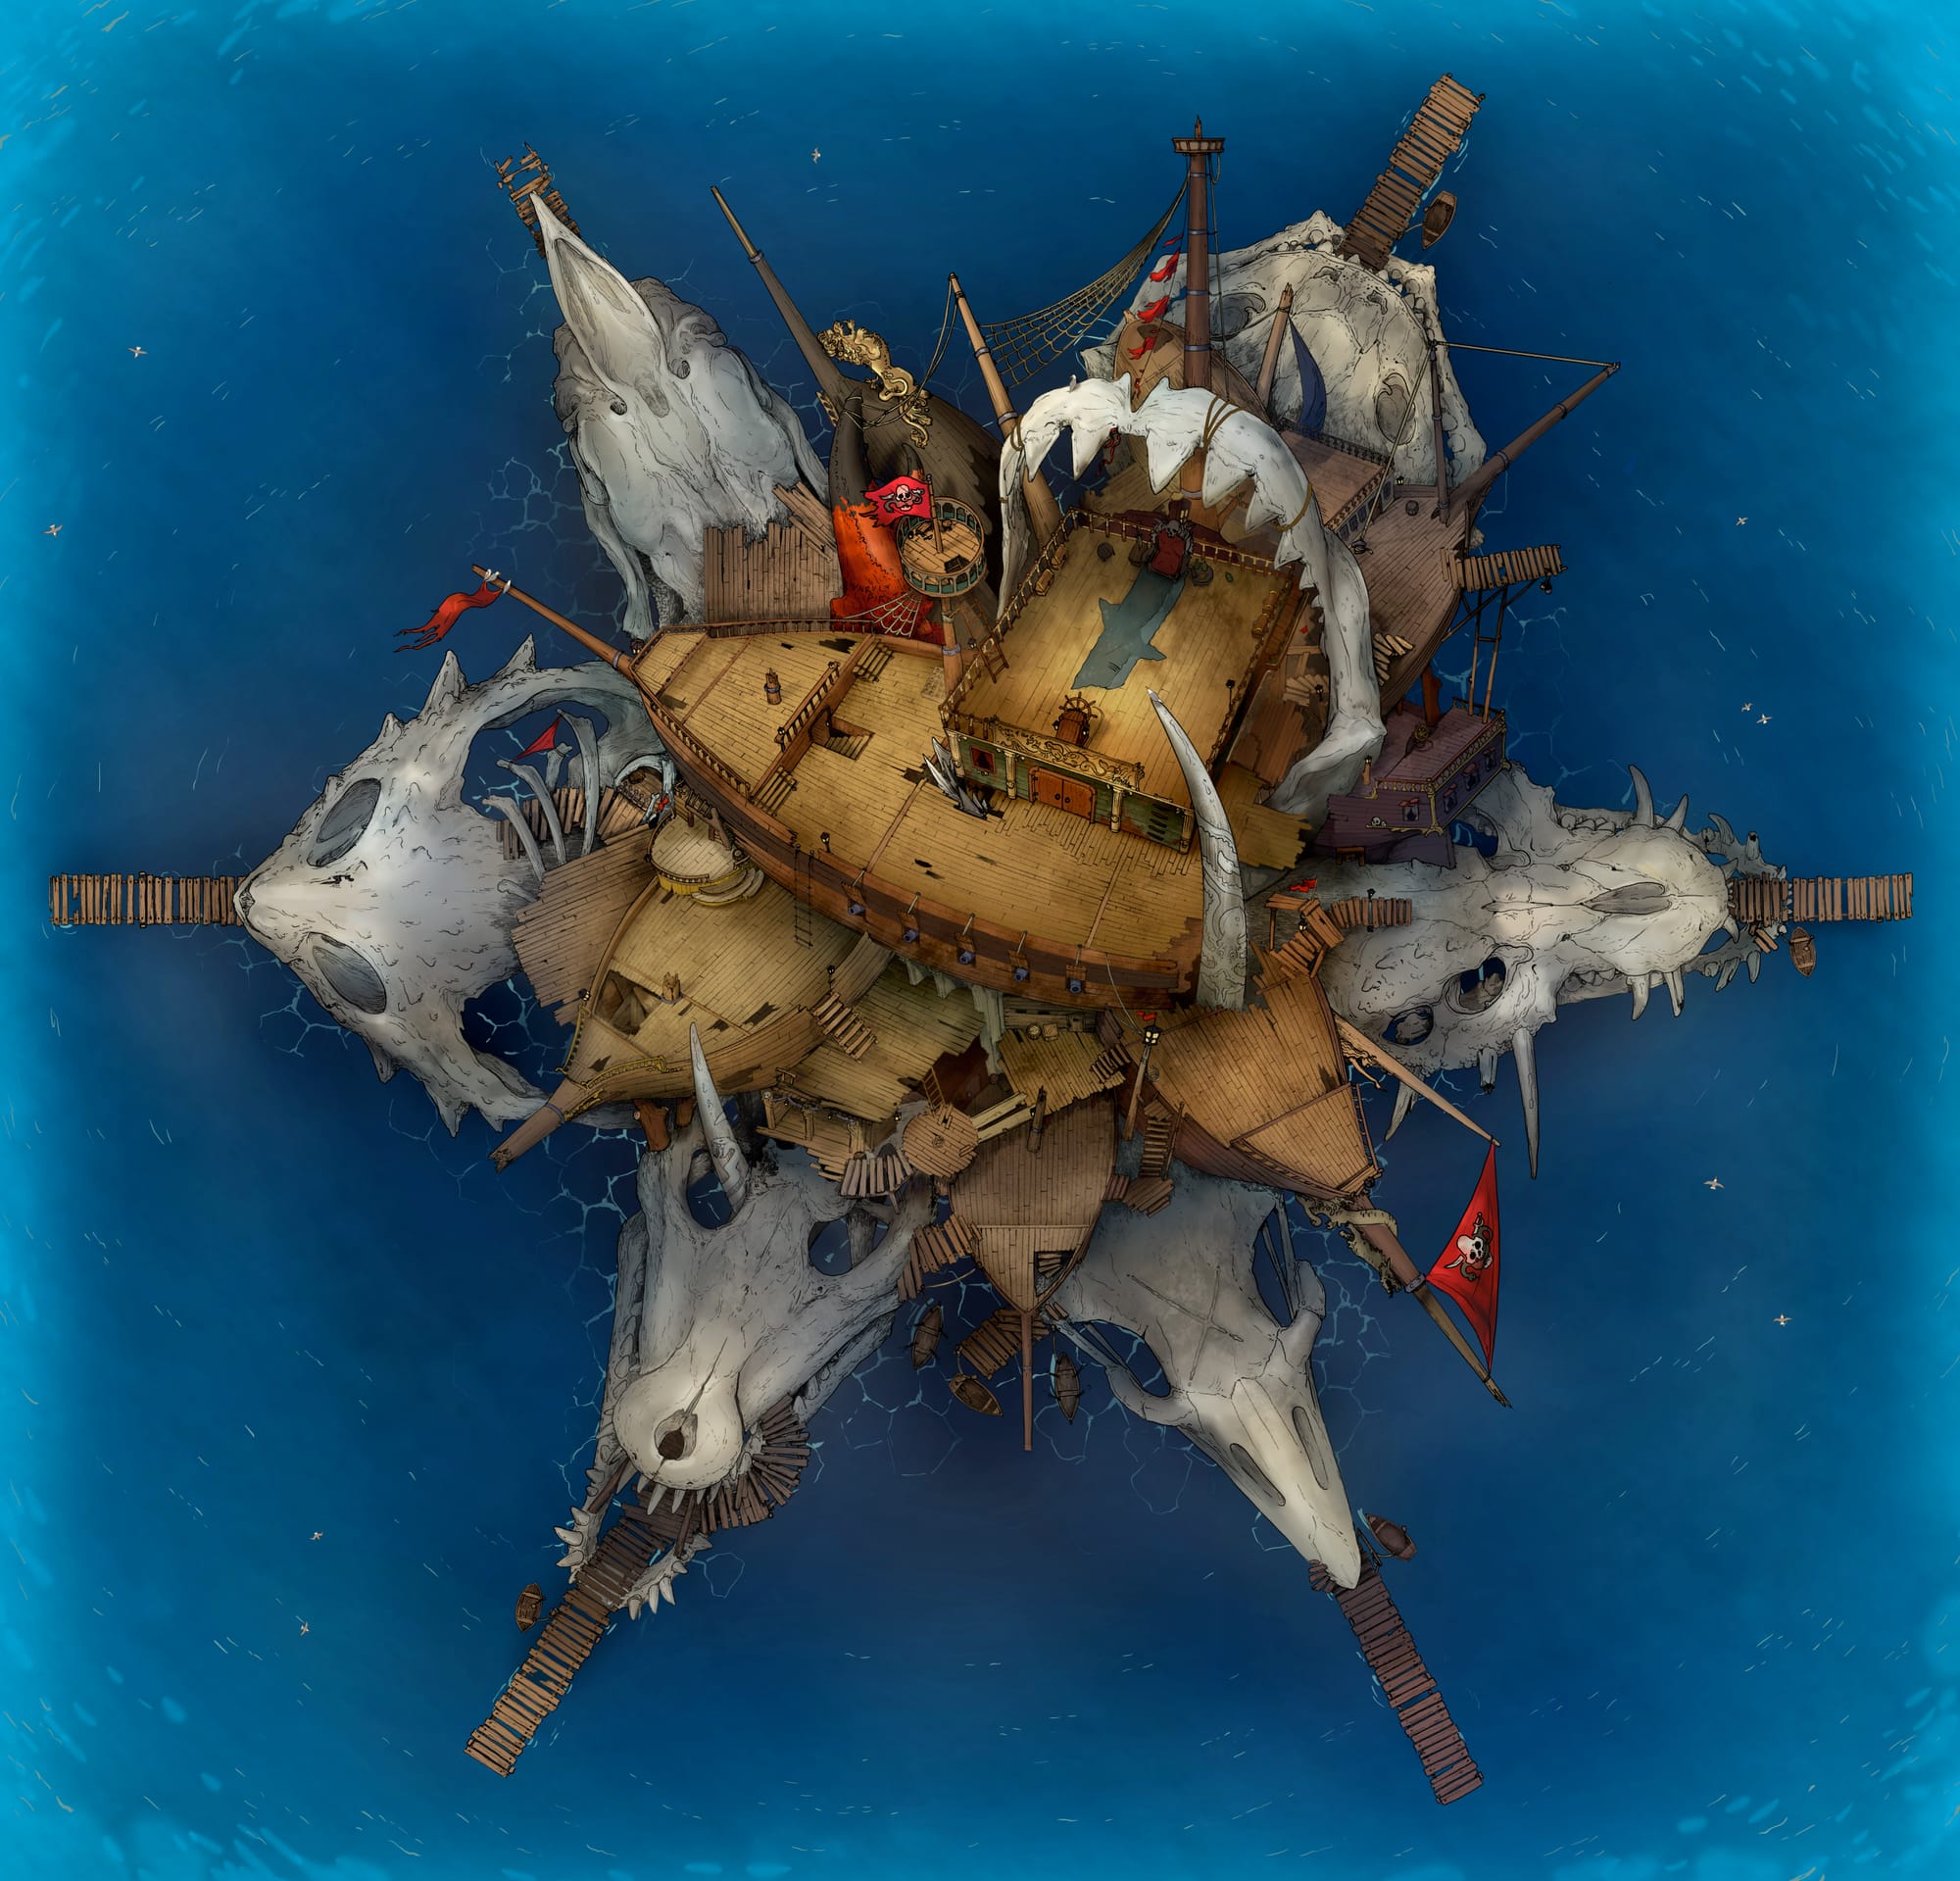
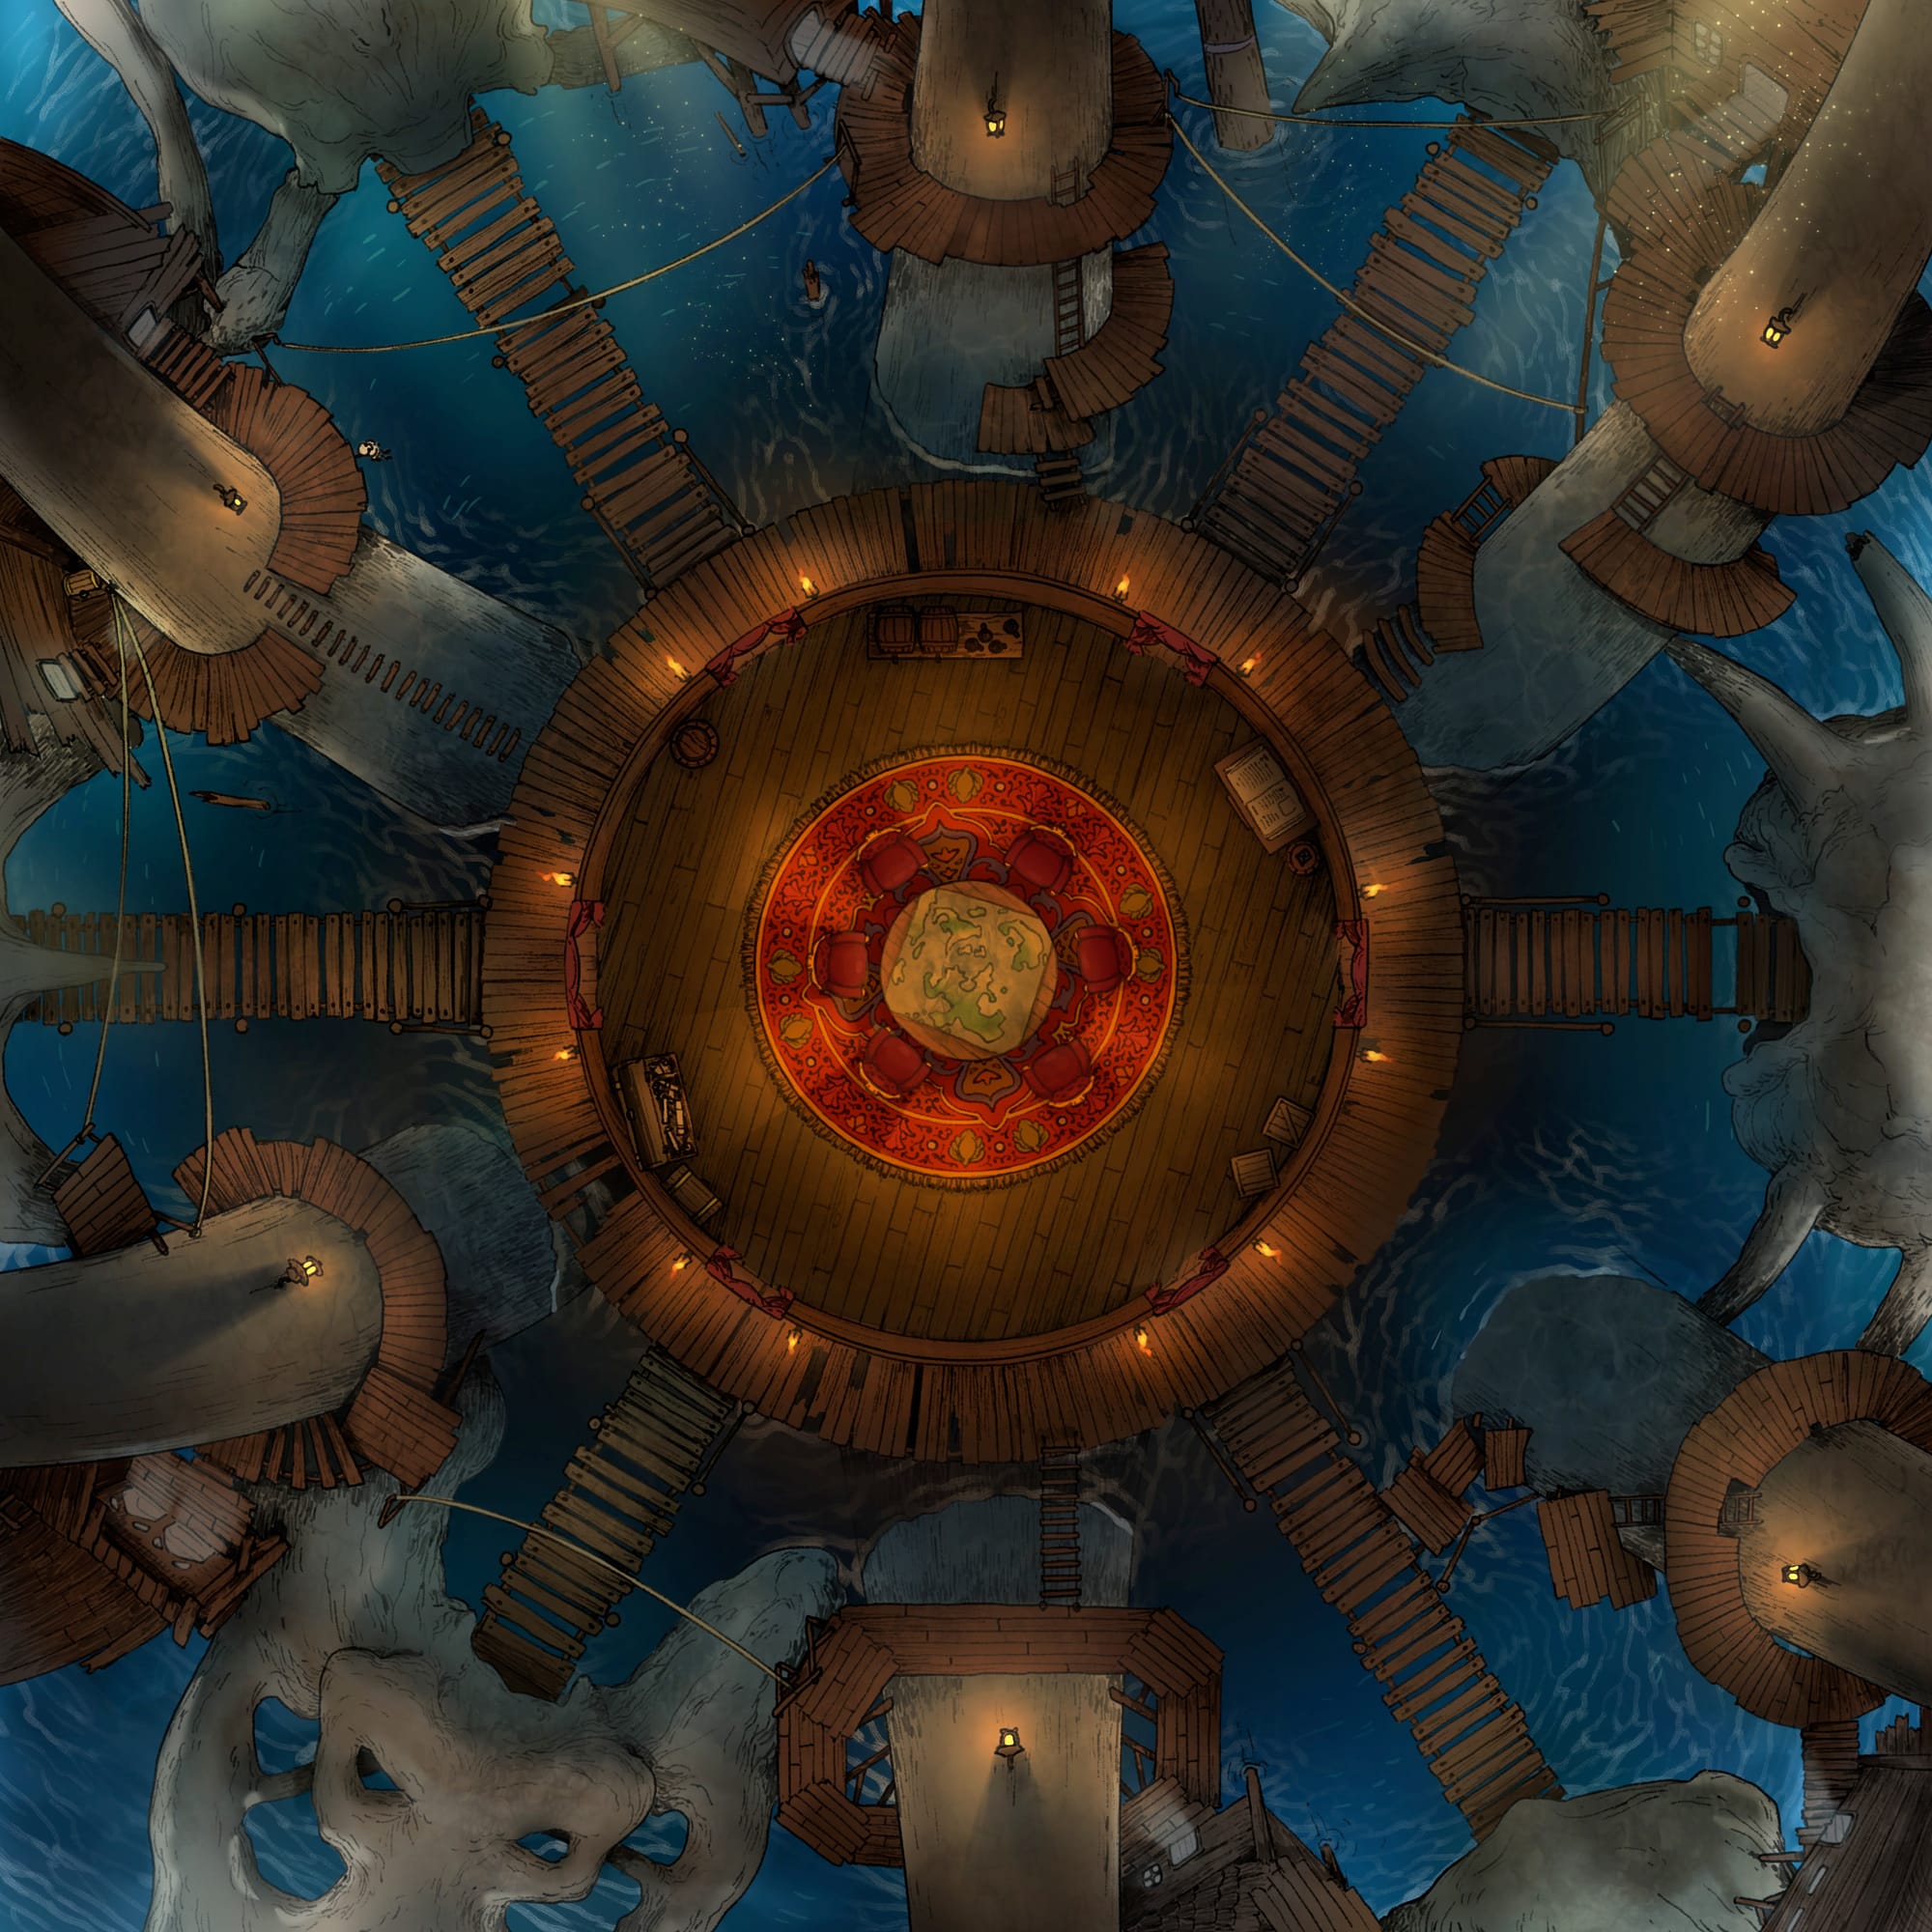
Two images. The first is a top-down view of a pirate stronghold in the middle of the ocean, built from massive marine animal skulls and wrecked ships. The second is the top-down view of a circular pirate hall interior with a large, plushly-decorated meeting space surrounded by passageways.
Armada represents naval power, contested authority, and wealth claimed through force—and so this Pirate Lord’s Lair collection captures that energy perfectly. The exterior map is a brutal display of dominance: shipwrecks and massive bones lashed together into an empire above the waves.
Step inside, however, and the tone shifts from spectacle to control. The interior maps pull players into the heart of Armada’s operations, where strategy is discussed, and loyalties are tested, and violence always feels close at hand. Use these maps for tense negotiations with Armada’s leadership, or as a backdrop for forging uneasy alliances between rival captains.
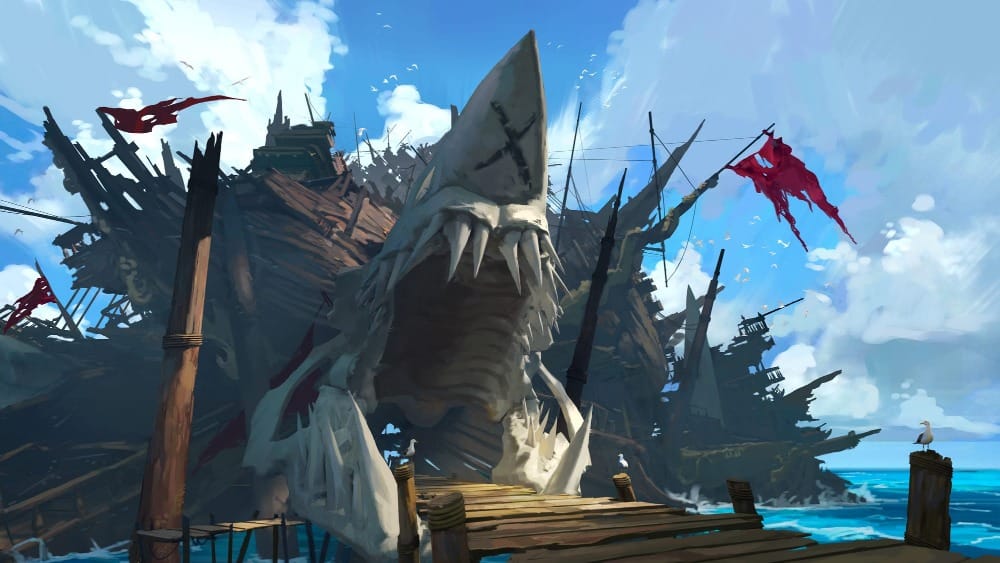
This map also comes with an illustrated scene of the pirate stronghold rising from the sea.
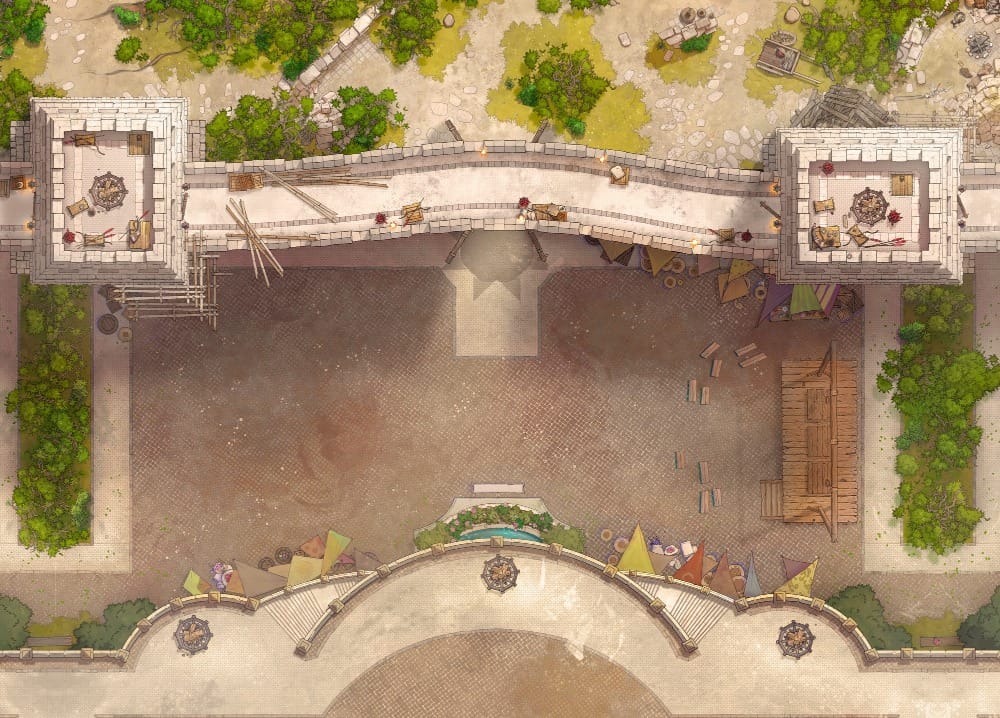
2. Hilltop — Grand Cathedral
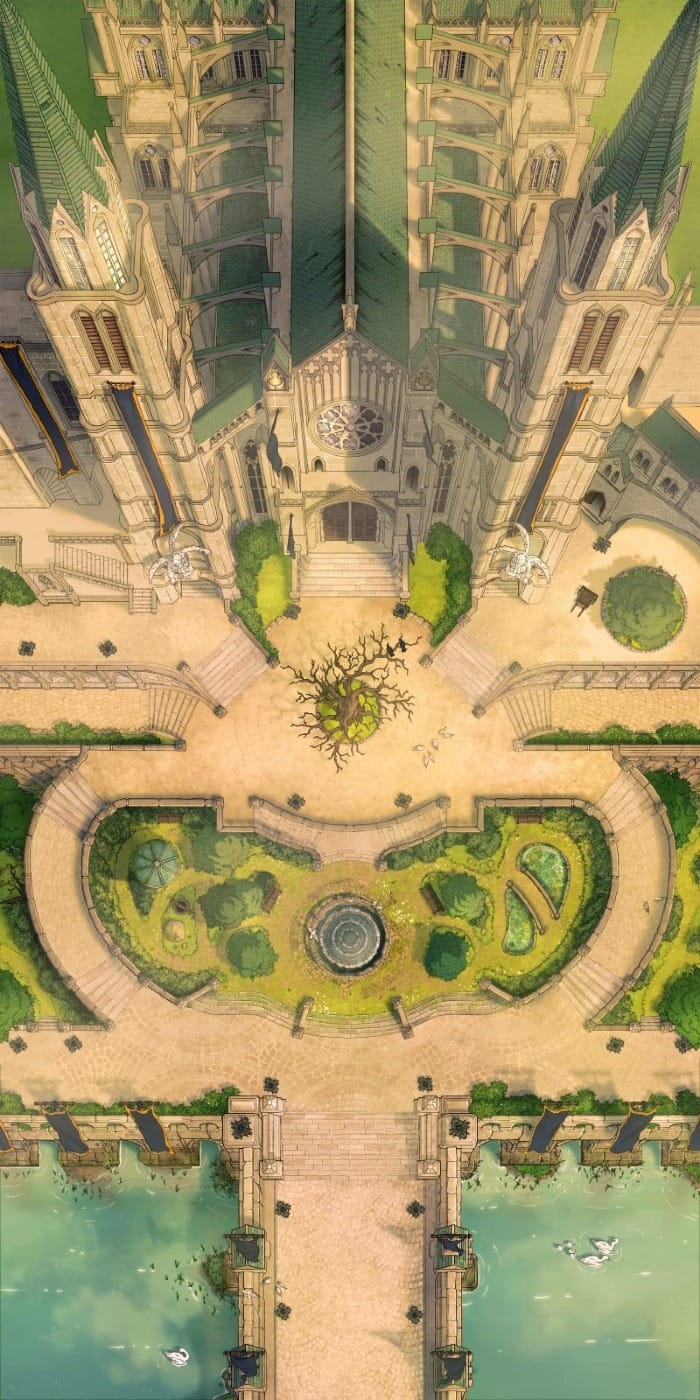
Hilltop’s authority is rooted in tradition, faith, and spectacle, and this Grand Cathedral map conveys that weight at a glance. A pristine courtyard stretches before towering stone walls, trimmed greenery framing a long approach across a bridge and moat. Above it all rises the cathedral itself—tall towers and sharp spires that reach skyward, both immaculate and imposing.
This exterior space is great for public gatherings and sermons delivered to packed crowds—moments where faith is wielded as political theater. Paired with the Grand Cathedral Interior map as well as its crypts and catacombs, this location could also hint at hypocrisy beneath the shining theocracy—perhaps some priests aren’t practicing what they preach in public sermons.
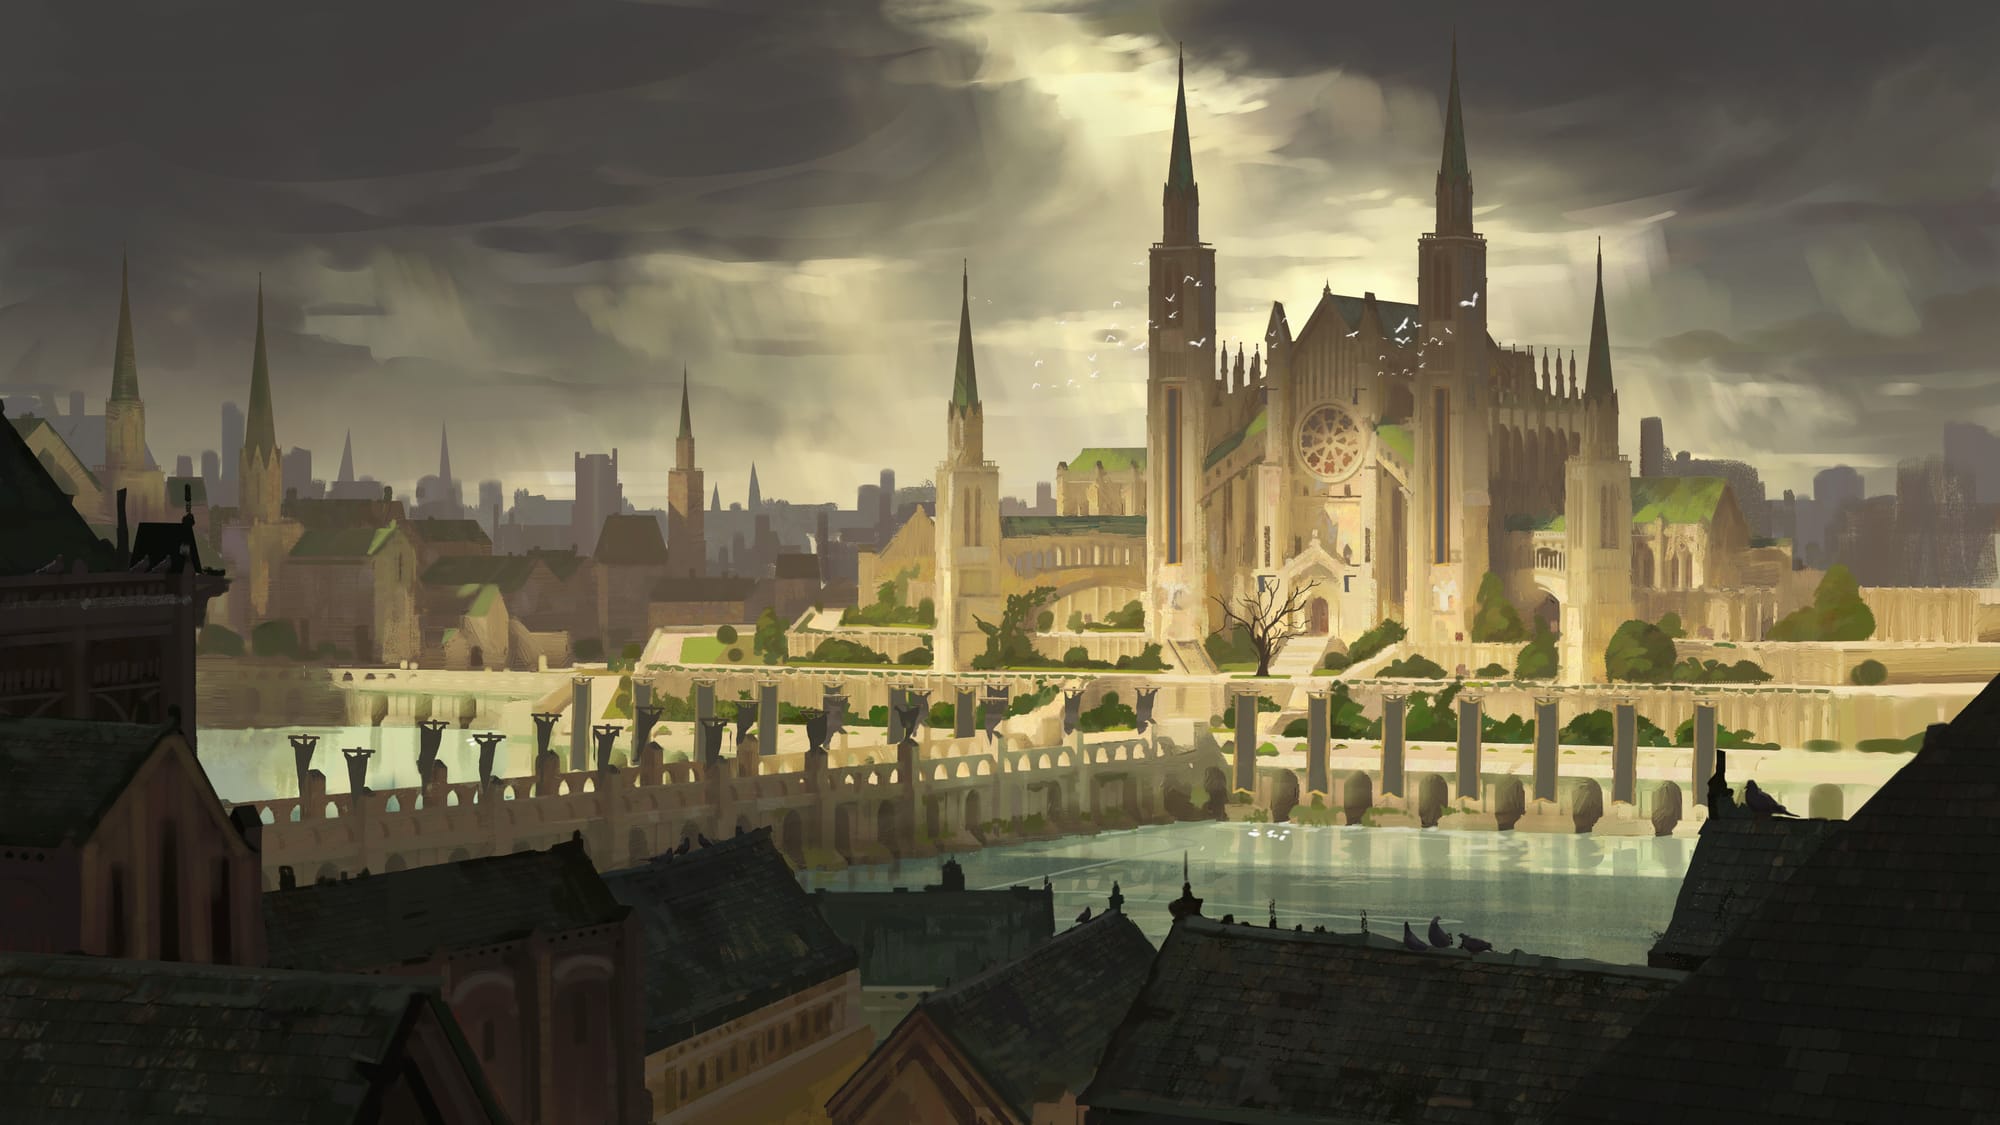
This map also comes with an illustrated scene of the cathedral’s grand courtyard and towering spires.
3. Jesthaen — Medieval Wartents
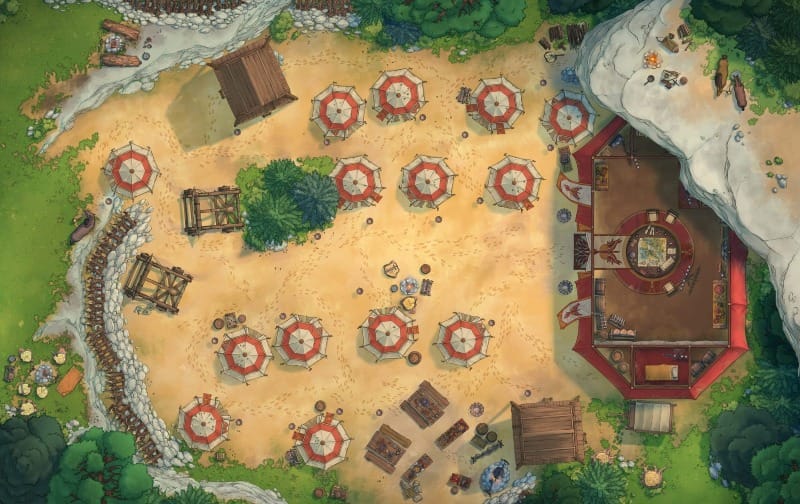
A young nation born of a bloody war, Jesthaen is defined by preparation and uncertainty—and this Medieval Wartents map reflects that uneasy balance perfectly. Rows of canvas tents cluster around catapults and supplies, forming a small settlement that’s both temporary but disciplined, always ready to pack up or brace for impact.
This map works great as a backdrop for where your players might receive military briefings and navigate shifting loyalties within a fragile command structure—whether they’re seeking support from, sowing dissent within, or uncovering the cracks in Jesthaen’s new authority.

This map also includes an illustrated scene of the wartime encampment, with disciplined rows of tents and weaponry at the ready.
4. Polaris — Warforged City Center
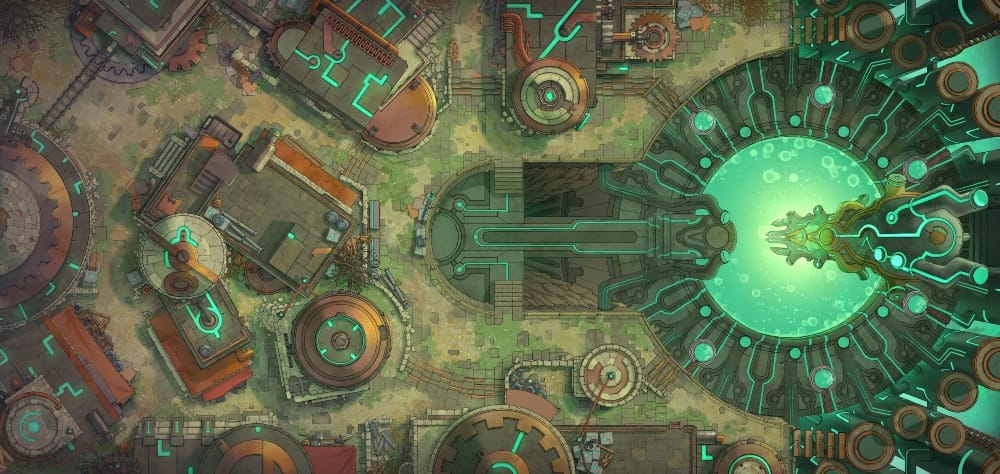
Polaris is an industrial city that projects order and efficiency, and this Warforged City Center map sells that identity instantly. Glowing wireframes, metallic structures, and rigid geometry give the space a high-tech and almost clinical feel.
Use this map to frame Polaris’ quotas, efficiency, and inspections—or the labor disputes and quiet unrest that emerge from a system that values progress over its people. It’s an excellent space to make your players feel scrutinized, small, and reduced to variables within a much larger industrial system.
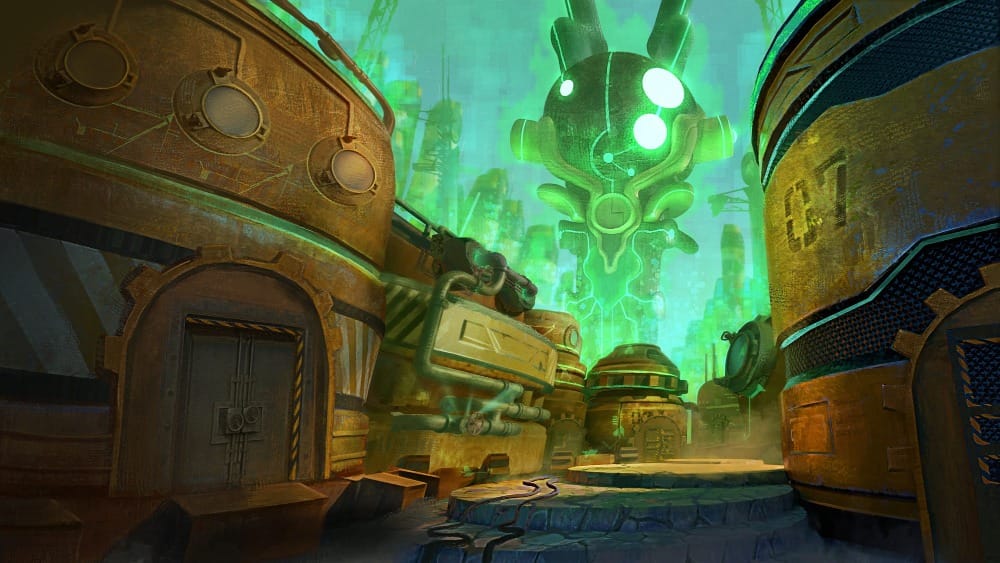
This map also comes with an illustrated scene set amidst the city streets, where rigid metal buildings press together, and a vast central machine looms in the distance.
5. Political Intrigue — Prismatic Ballroom
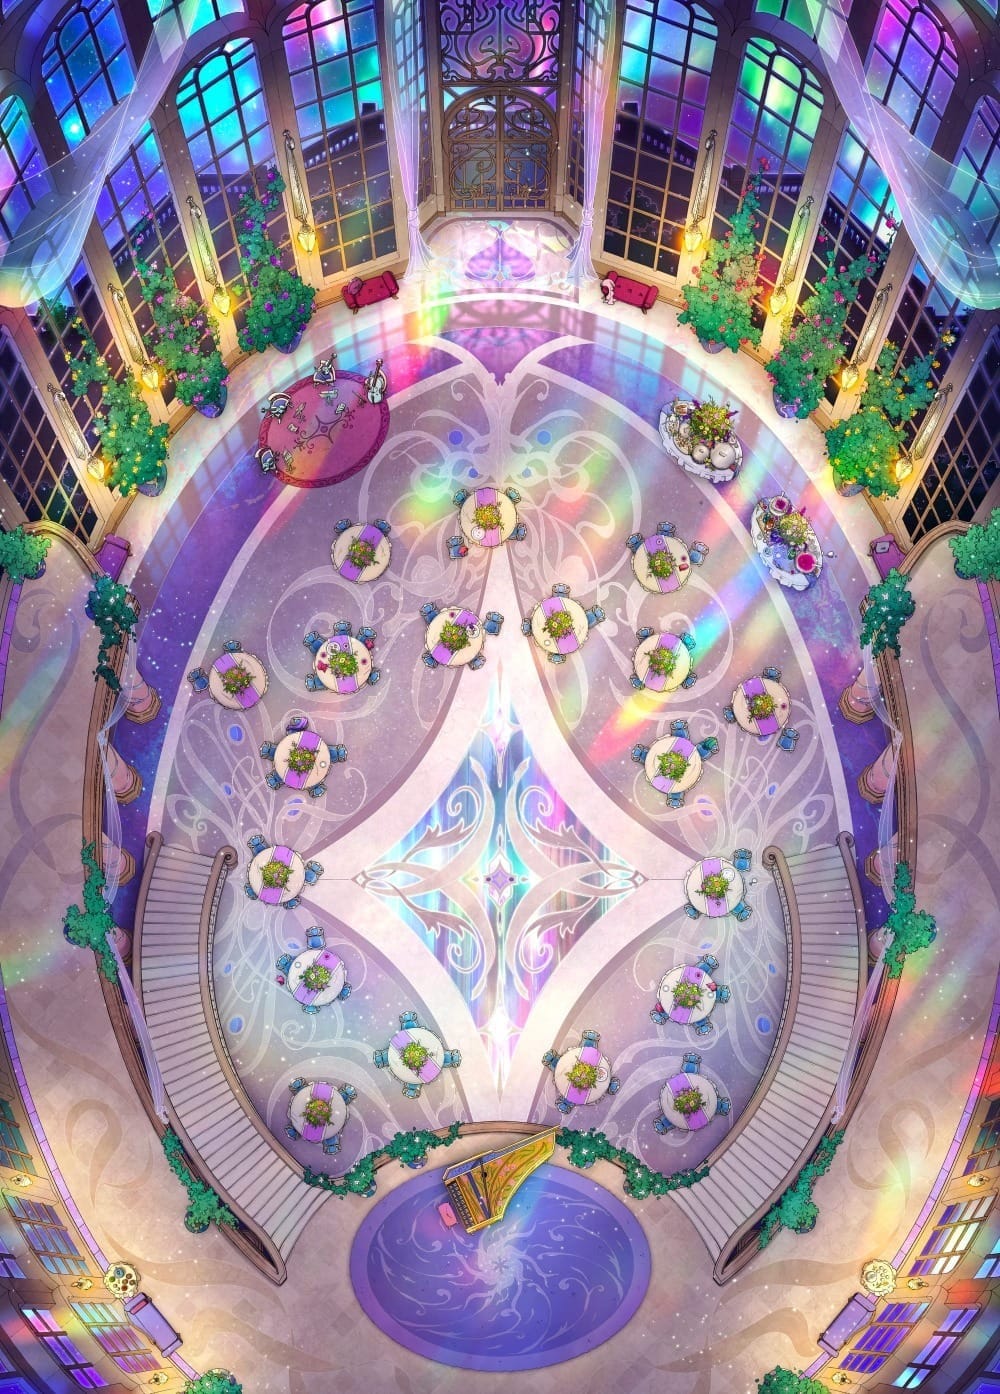
Few places say “something important is about to happen” quite like this breathtaking Prismatic Ballroom. Glittering floors catch the dramatic light, and elegant decor sets the stage elegantly for political theater at its finest.
This map shines its brightest during formal events, such as diplomatic receptions, masquerades, or celebrations designed to hide deep political fractures beneath the surface. It’s easy to imagine musicians playing in the background, servants weaving through the crowd with trays of drinks, and whispered conversations happening just out of earshot—perfect for social intrigue-heavy sessions!
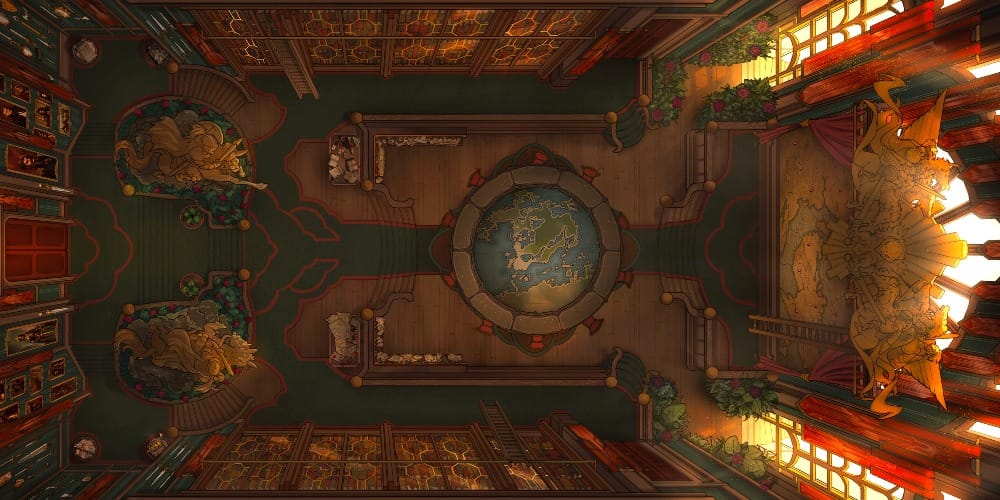
6. Political Intrigue — Royal Palace Series
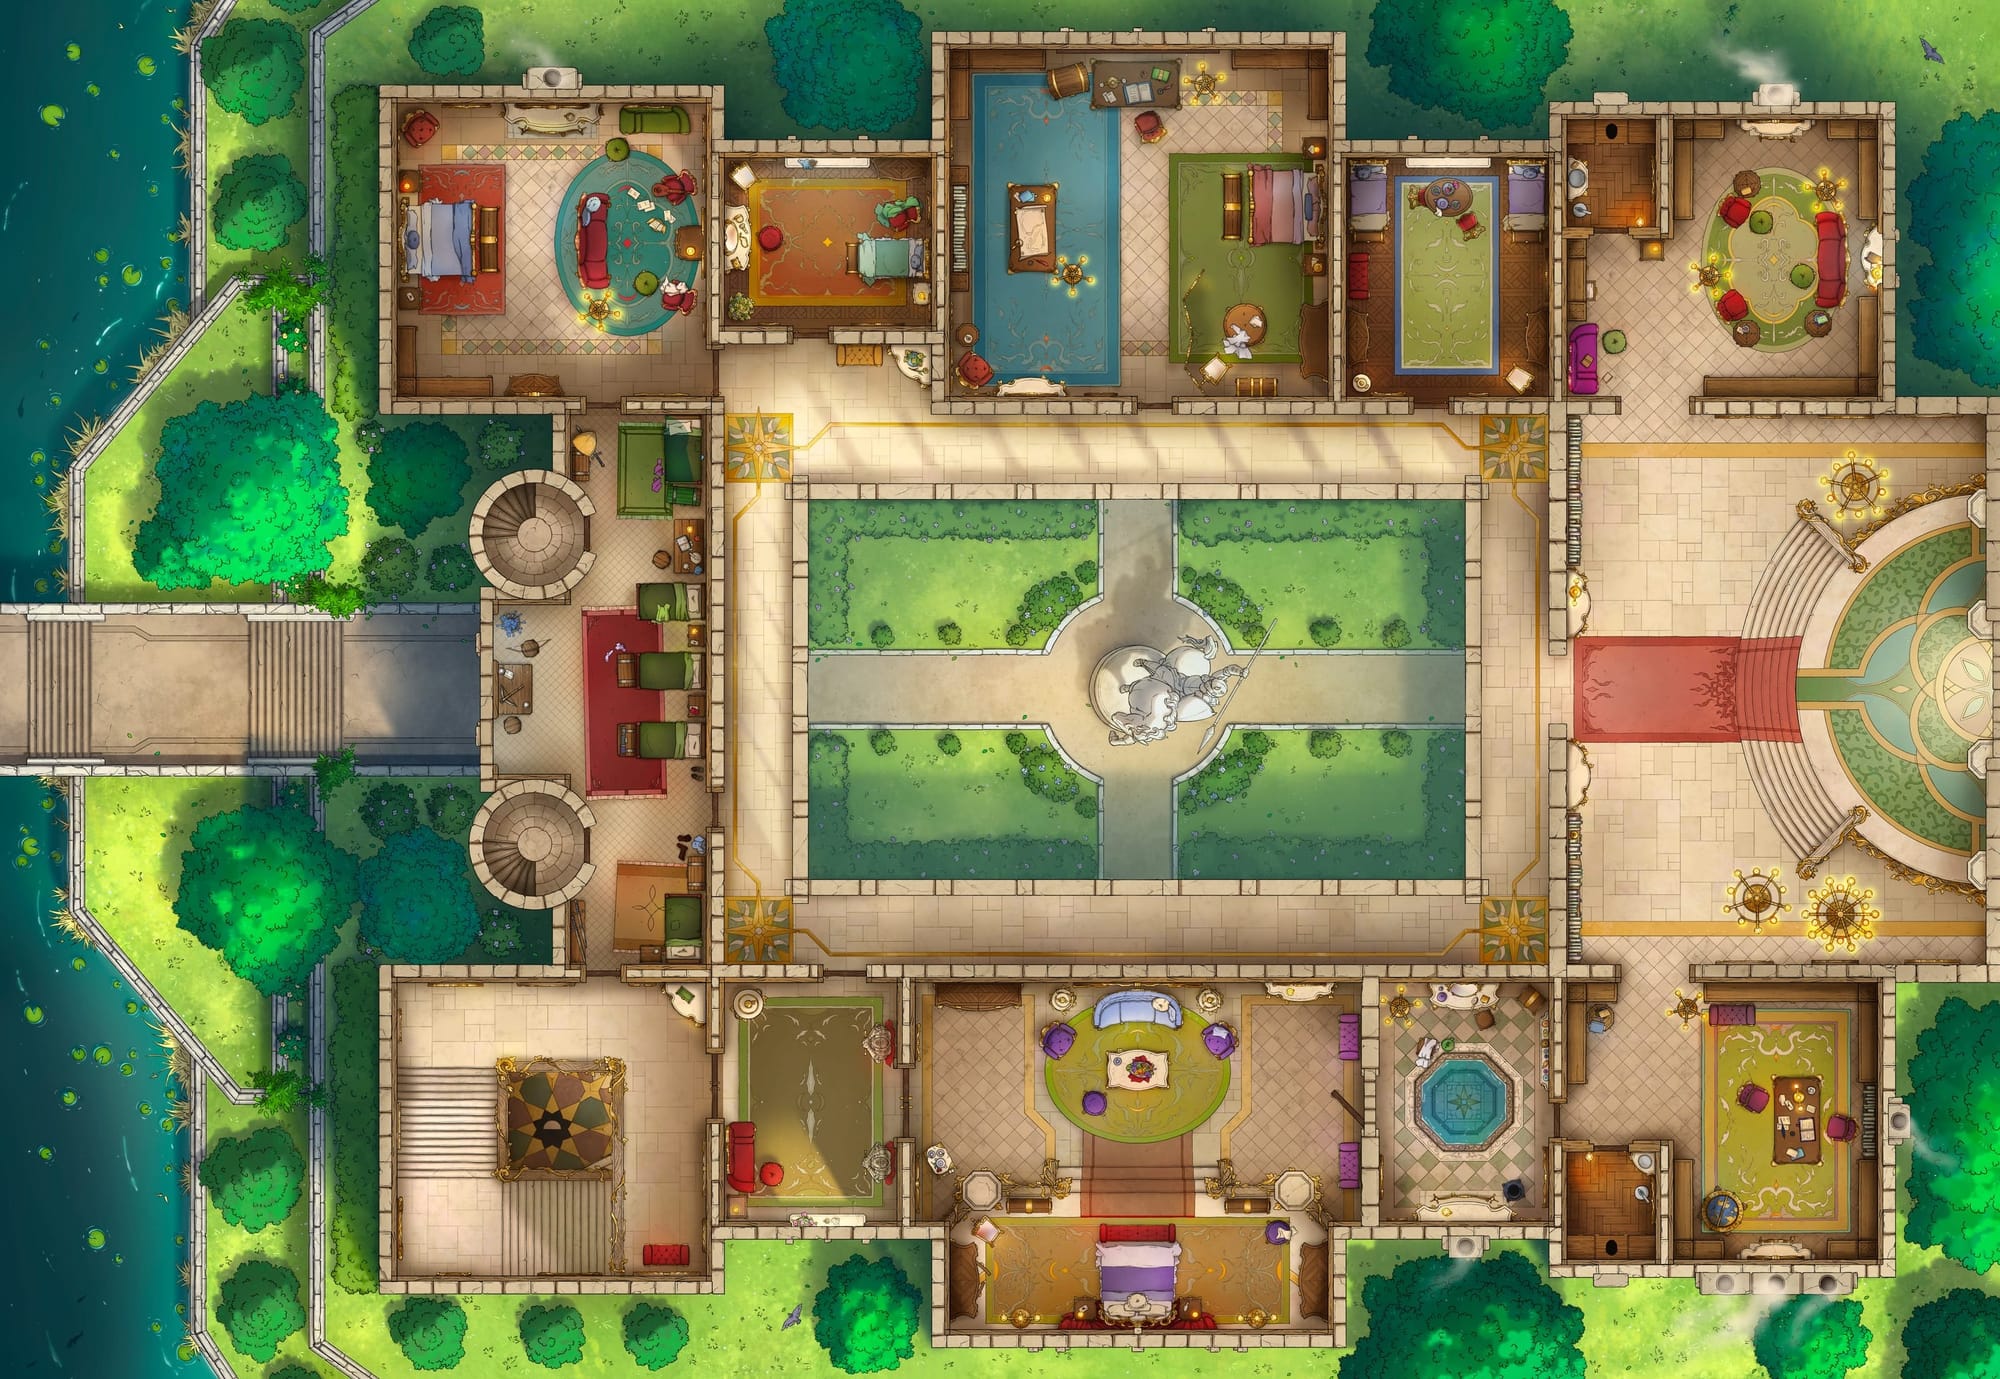
Where the ballroom dazzles, this Royal Palace map series reveals the full machinery of political power. Grand halls give way to guarded corridors, courtyards are bordered by lavish chambers, and inner sanctums hold quiet rooms where decisions are made—decisions that will ripple outwards to affect thousands.
This series of maps works wonderfully for extended political intrigue arcs—such as audiences with rulers, coups in motion, and tense political plays that move from public display to private confrontation. With so many interconnected spaces, you can populate the palace with all sorts of interesting NPC advisors, guards, rivals, and servants—making it feel alive even during dense political intrigue campaigns.
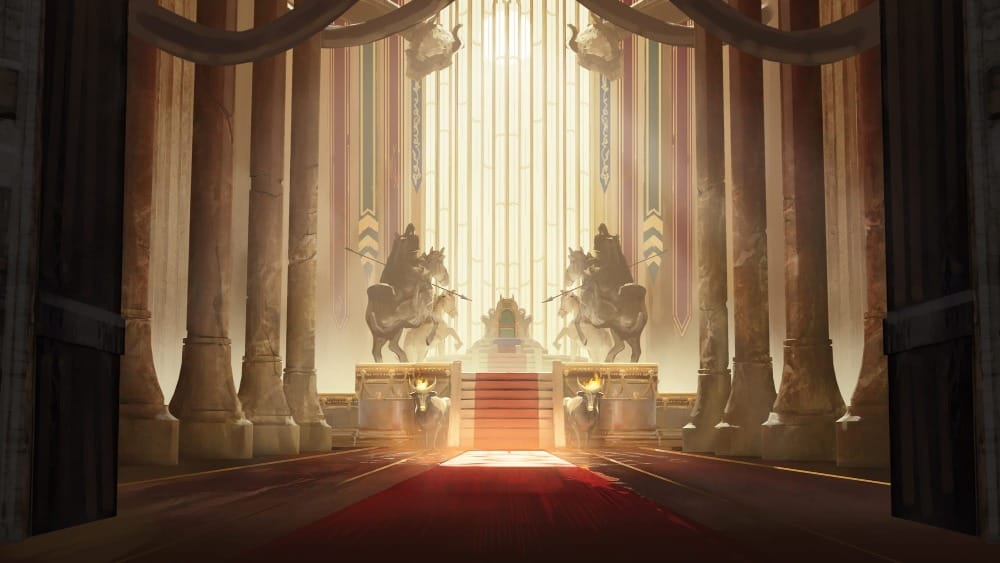
This map also comes with an illustrated scene of the palace’s magnificent throne room, where towering pillars, red banners, and watchful statues frame the long ascent to the throne.
7. Urban Undersides — Low Town Docks
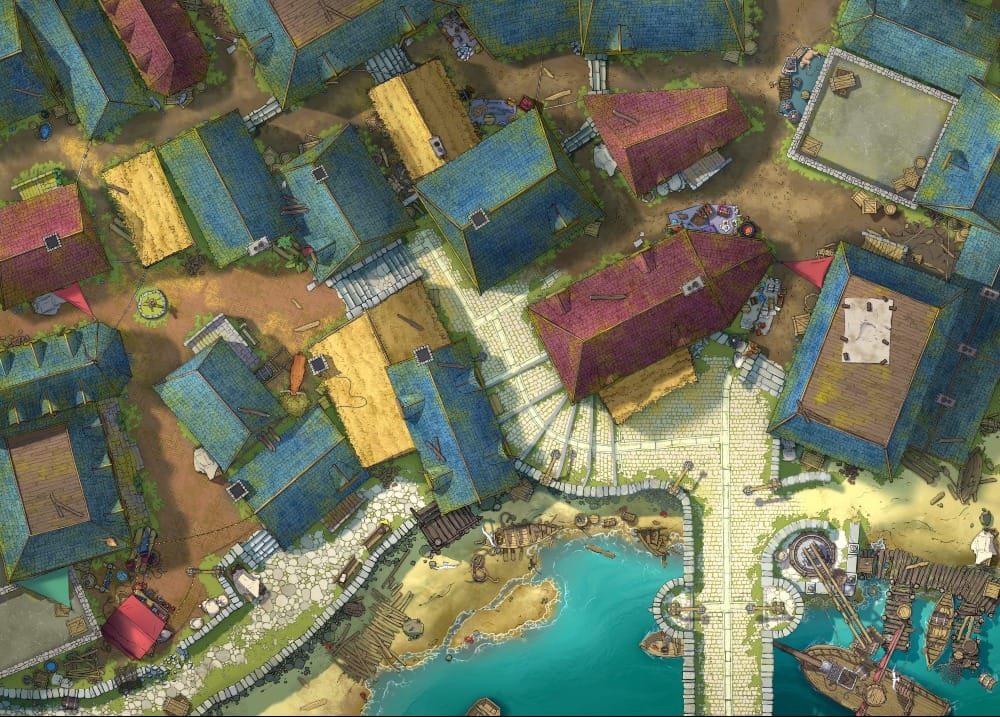
In contrast to pristine palaces and manicured courtyards, these Low Town Docks are busy, crowded, and relentlessly alive. Wooden piers creak underfoot, water laps at ship hulls, and the air hangs heavy with the stench of fish and smoke.
This map captures the pulse of a hardworking waterfront where goods—and more importantly, information—move around constantly. Use it to stage smuggling operations, cover meetings with criminals and rebels, or even frantic chases over ramshackle rooftops.
It’s also an excellent place to show how political decisions ripple downwards—after all, it’s often the common folk who feel the pain of war long before it reaches palace walls.
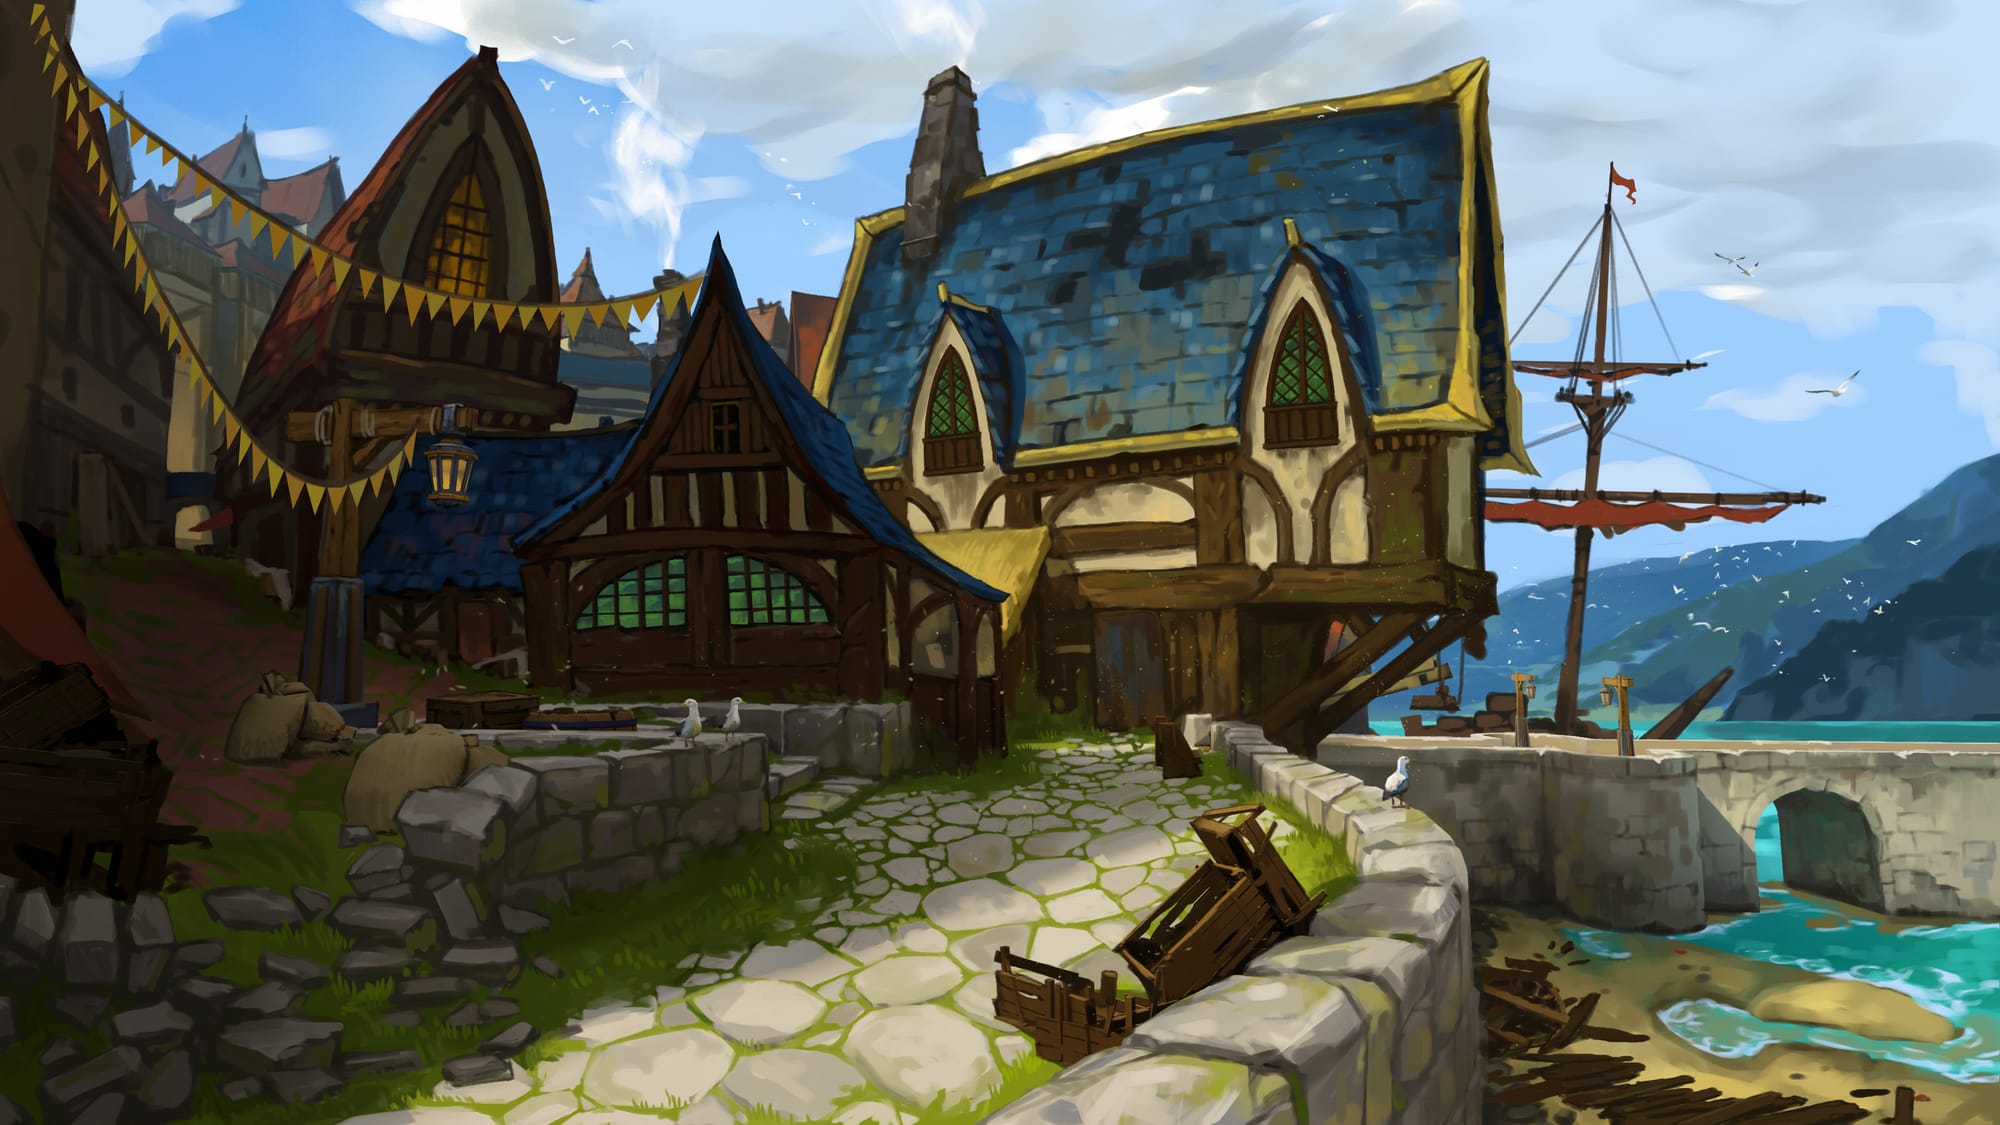
This map also comes with an illustrated scene of the busy waterfront and ramshackle neighborhood.
8. Military Infrastructure — Great Wall
In a campaign frame so focused on sociopolitical friction, the threat of open conflict always looms—and the Great Wall map makes that tension tangible. Towering stone battlements and narrow walkways rise as a city’s first line of defense, built with the singular purpose: protection at any cost.
This map is great for border standoffs and desperate defenses—are your players confronting those who are being kept out, or are they the ones trying to fight their way inside? Whether fully manned or stretched thin, this wall tells a story of fear, war, and the compromises made in the name of safety.
9. Military Infrastructure — War Room Interior
While banners burn and soldiers clash outside, this War Room Interior is where futures are decided. Unlike the rough practicality of war tents and battlefields, this is an elegant space: a massive central war table dominates the room, while raised platforms display atlases, as statues loom over deliberations.
Use this map as a backdrop for heated debates among leaders or for revelations that can shift the course of the campaign. Paired with either the aforementioned Great Wall or war tents, it highlights the distance between command and consequences—and asks your players to reckon with the weight of decisions made so far from the front lines.
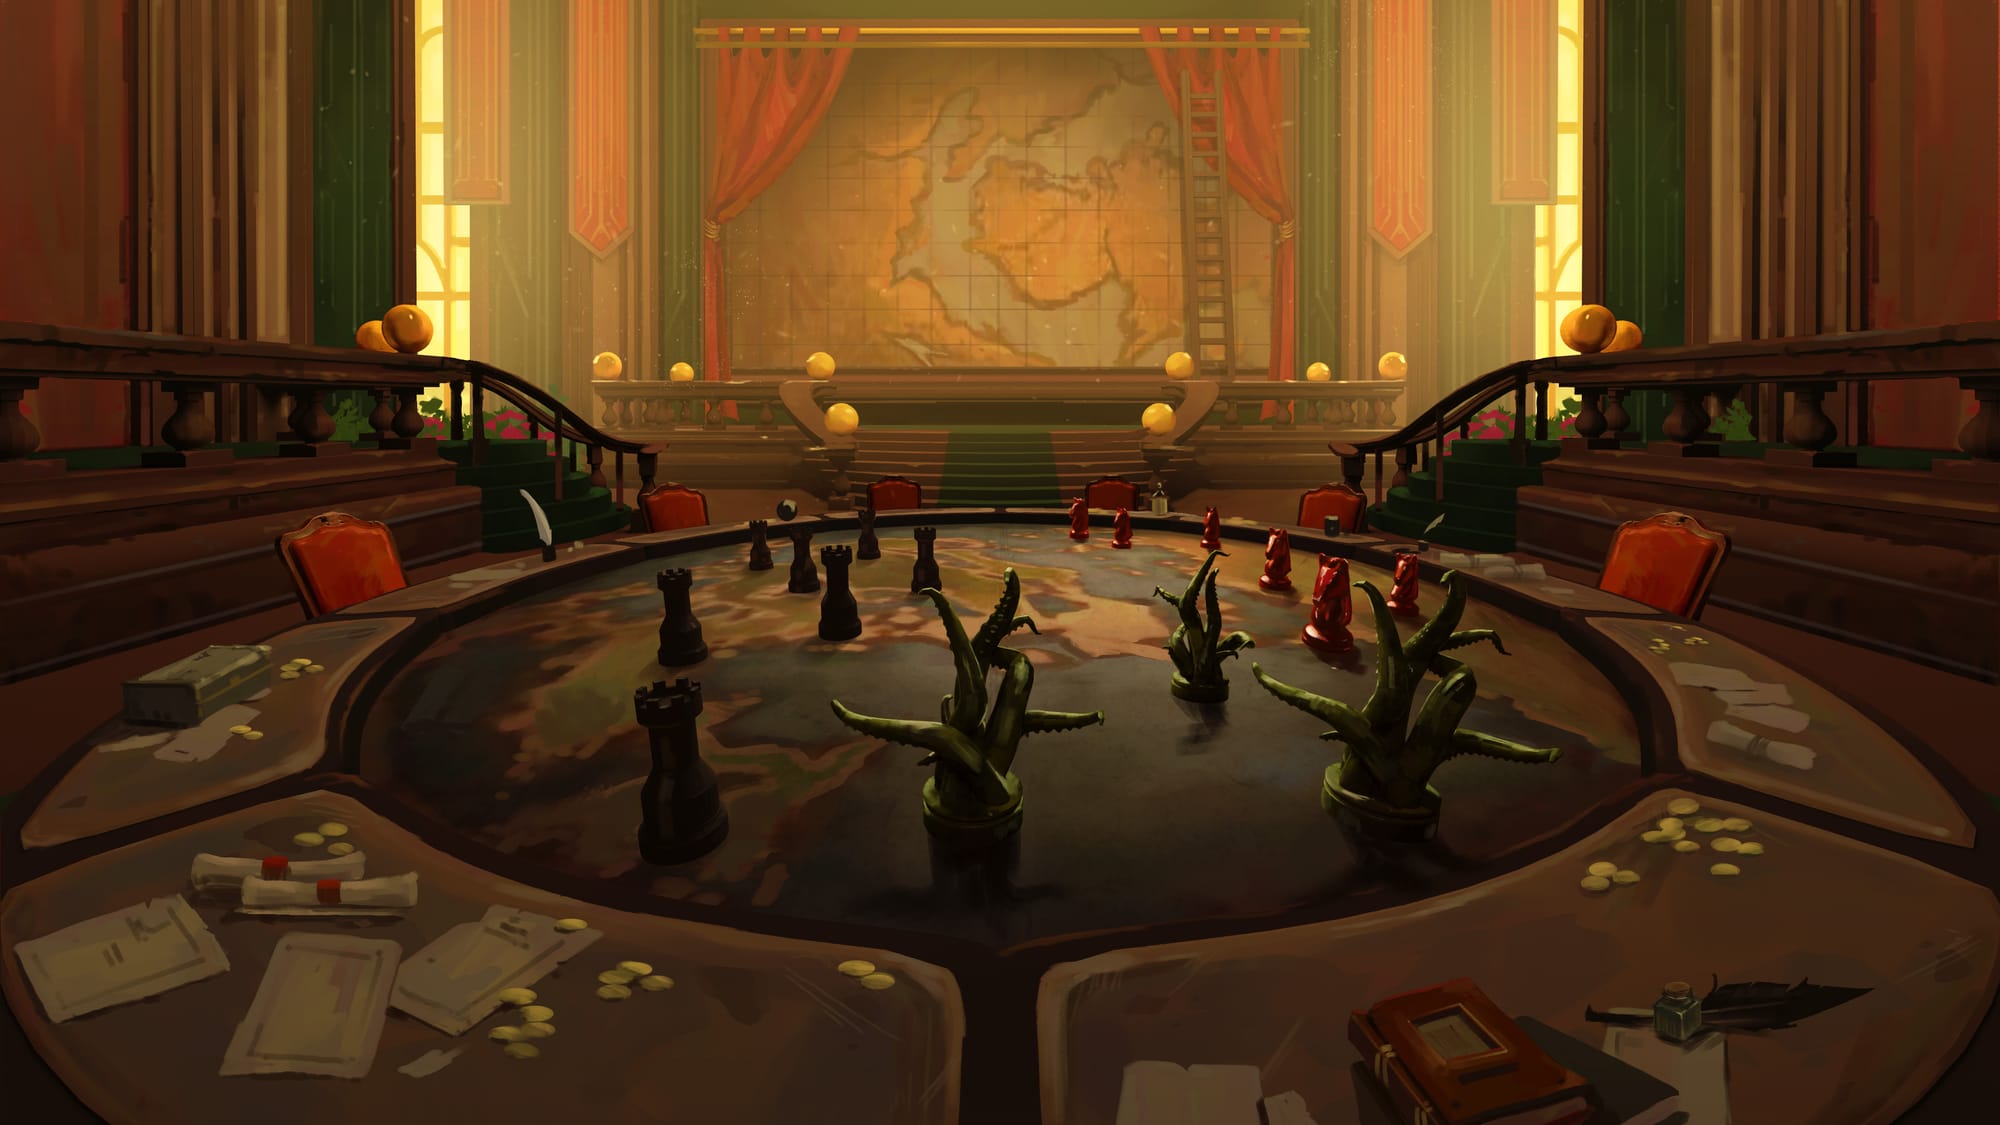
This map also includes an illustrated scene of the war chamber from the edge of the central strategy table, where carved army figurines stand poised across detailed maps.
10. Refugee Camps / Displaced Communities — Clifftop Warcamp
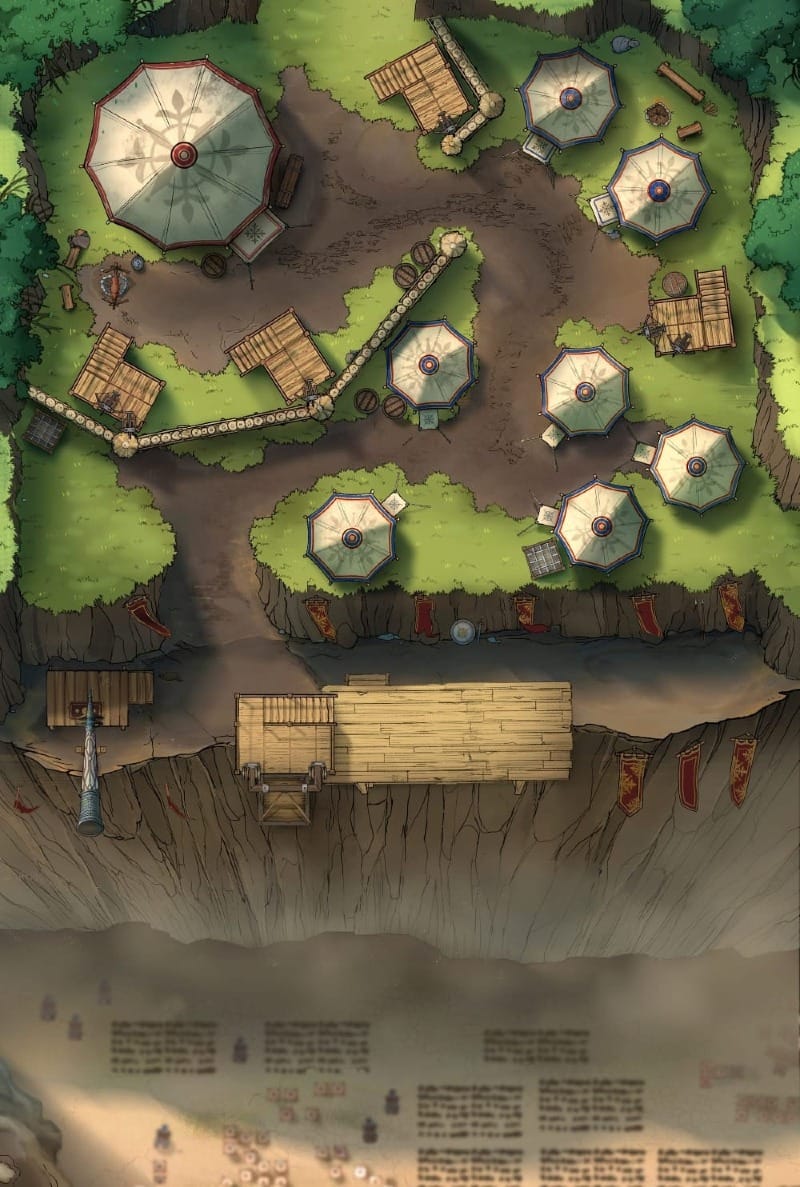
Perched precariously over a steep drop, this Clifftop Warcamp feels fragile but determined. Tents cluster together in limited space, sparse supplies are strewn around, and the surrounding drop-off makes the camp feel both protected and trapped.
Use this map to ground your campaign emotionally—after all, a core player principle of the frame is to “Grapple with the Impact of Your Actions on Everyday People”. This is a powerful space for introducing displaced NPCs, moral dilemmas, and moments of quiet humanity amid the war flags flying overhead. Against the grandeur of palaces and fortifications, small warcamps like these serve as a reminder of who ultimately bears the cost when banners burn.
Five Banners Burning is a campaign frame that works only when each of its locations feels alive—from crowded docks and refugee camps to glittering ballrooms and powerful palaces. These maps help bring that energy to the table, giving your players a clear picture of the power, danger, and tragedy lurking at every turn in this evocative campaign frame.
If you’re looking to expand your world further, Czepeku’s map library includes over 8,000 hand-drawn battlemaps covering everything from bustling city centers to treacherous wildlands—making it easy to support a Five Banners campaign as tensions rise and fragile alliances give way.
Start Your Adventure With a FREE Asset Pack!
Keep up to date with the latest from Czepeku, sign up to our mailing list now and receive an introductory goodie bag of fantasy and sci-fi maps, scene, and tokens.